
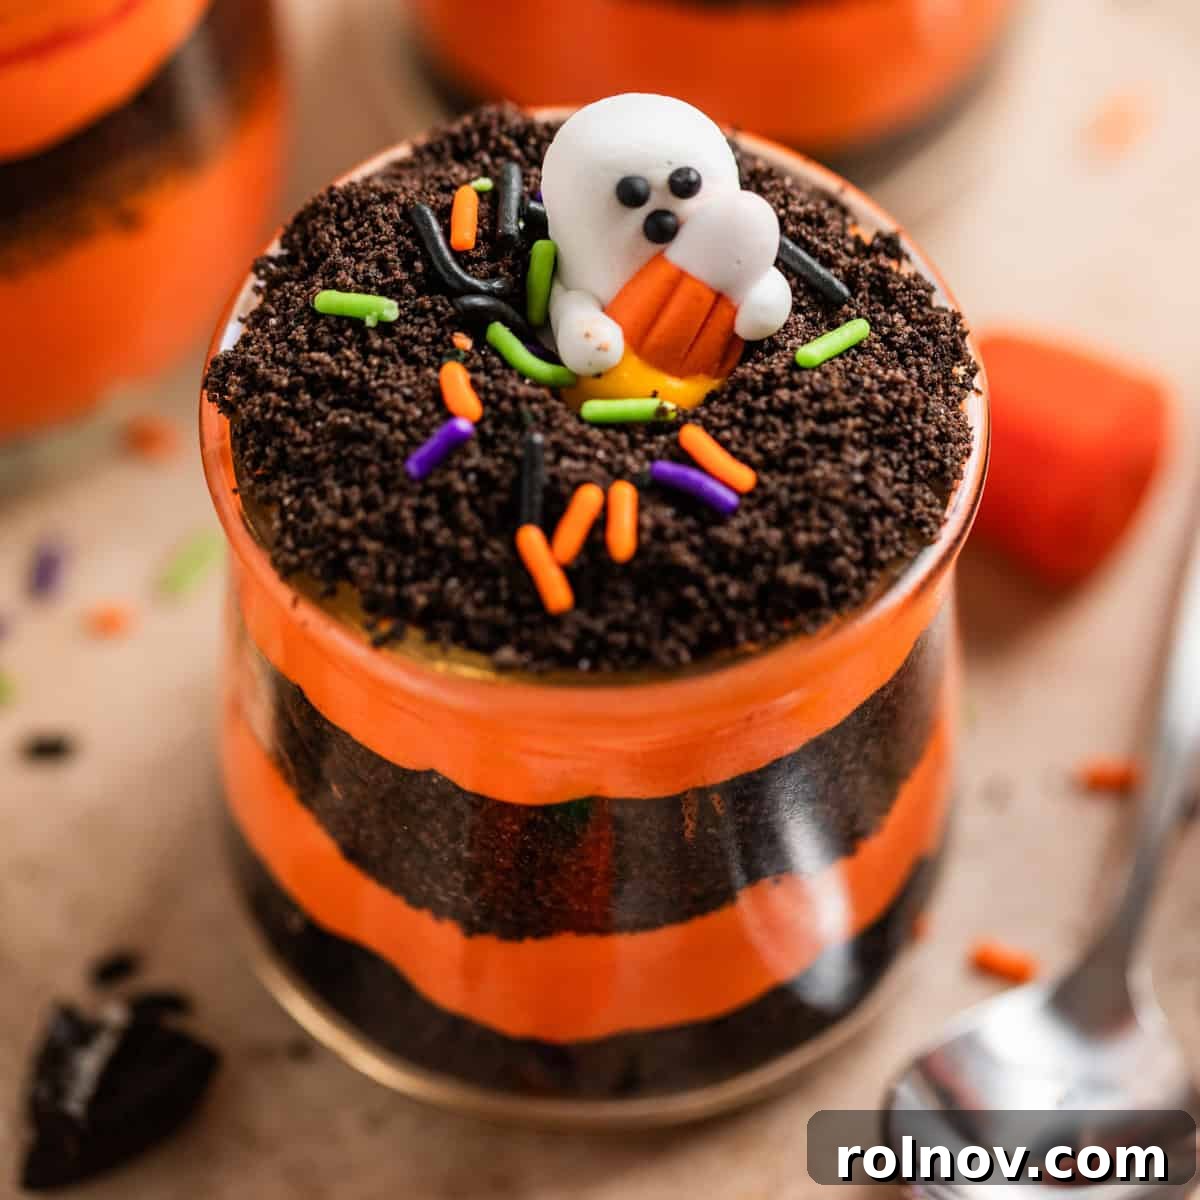
Indulge in the perfect blend of spooky and sweet with this irresistible Halloween Oreo Dirt Cake recipe! A beloved, kid-friendly treat gets a festive twist, making it an ideal centerpiece or individual dessert for any Halloween gathering. Effortlessly assembled in about 15 minutes, this no-bake delight promises rich, creamy layers and a delightfully eerie appearance that will enchant guests of all ages. Whether you prefer grand servings in a trifle dish or charming individual cups, this recipe offers versatility and deliciousness in every haunting bite.

While Halloween might not be everyone’s favorite holiday for spooky costumes and haunted houses, it’s undeniably a fantastic excuse to whip up some delicious themed treats! And when it comes to desserts, few things capture the imagination (and taste buds) quite like a classic dirt cake, especially when it features the iconic Oreo cookie. This particular Halloween Oreo Dirt Cake recipe takes inspiration from the timeless dirt cake and my popular No Bake Oreo Cheesecake Cups, combining the best of both worlds into one festive, easy-to-make confection.
Imagine a dessert that’s not only rich and creamy but also boasts vibrant Halloween colors and a playfully spooky vibe. That’s exactly what you get with this dessert! It’s a fantastic alternative to traditional baked goods and a definite crowd-pleaser. If you’re looking for more no-bake spooky treats, you might also enjoy these No Bake Halloween Cake Pops.
Why This Halloween Oreo Dirt Cake is Your New Go-To Spooky Treat:
This Halloween Oreo Dirt Cake isn’t just another dessert; it’s a celebration of convenience, creativity, and deliciousness, perfectly suited for the autumn season. Here’s why it’s bound to become a staple for your annual Halloween festivities:
- Effortlessly No-Bake: Forget preheating ovens and precise baking times. This recipe requires absolutely no baking, making it perfect for busy schedules and a fun project for all ages. It’s a simple assembly job that yields impressive results.
- Incredibly Versatile Serving Options: Whether you’re hosting a grand Halloween bash or a cozy family movie night, this dirt cake adapts to your needs. Prepare it in a large, dramatic trifle dish for a stunning presentation or portion it into individual cups for easy serving and a personalized spooky treat.
- A Universal Favorite: Designed to delight both the young and the young at heart, this dessert is a guaranteed hit. Kids adore the “dirt” layers and the fun, festive decorations, while adults appreciate the rich, creamy texture and nostalgic flavor.
- Customizable for Any Occasion: While designed for Halloween with its vibrant orange and black theme, this recipe is incredibly flexible. Easily swap out the food coloring and sprinkles to match any holiday, team colors, or birthday party theme, making it a year-round favorite.
- Quick to Prepare: With a prep time of around 15-20 minutes, this dessert comes together rapidly, leaving you more time to enjoy the festivities.
- Minimal Cleanup: As a no-bake recipe, you’ll find cleanup to be a breeze, allowing you to spend less time scrubbing and more time celebrating.
- Make-Ahead Friendly: For optimal flavor and texture, this dirt cake benefits from chilling, making it an excellent dessert to prepare a day in advance, reducing stress on the day of your event.
Gather Your Hauntingly Delicious Ingredients:
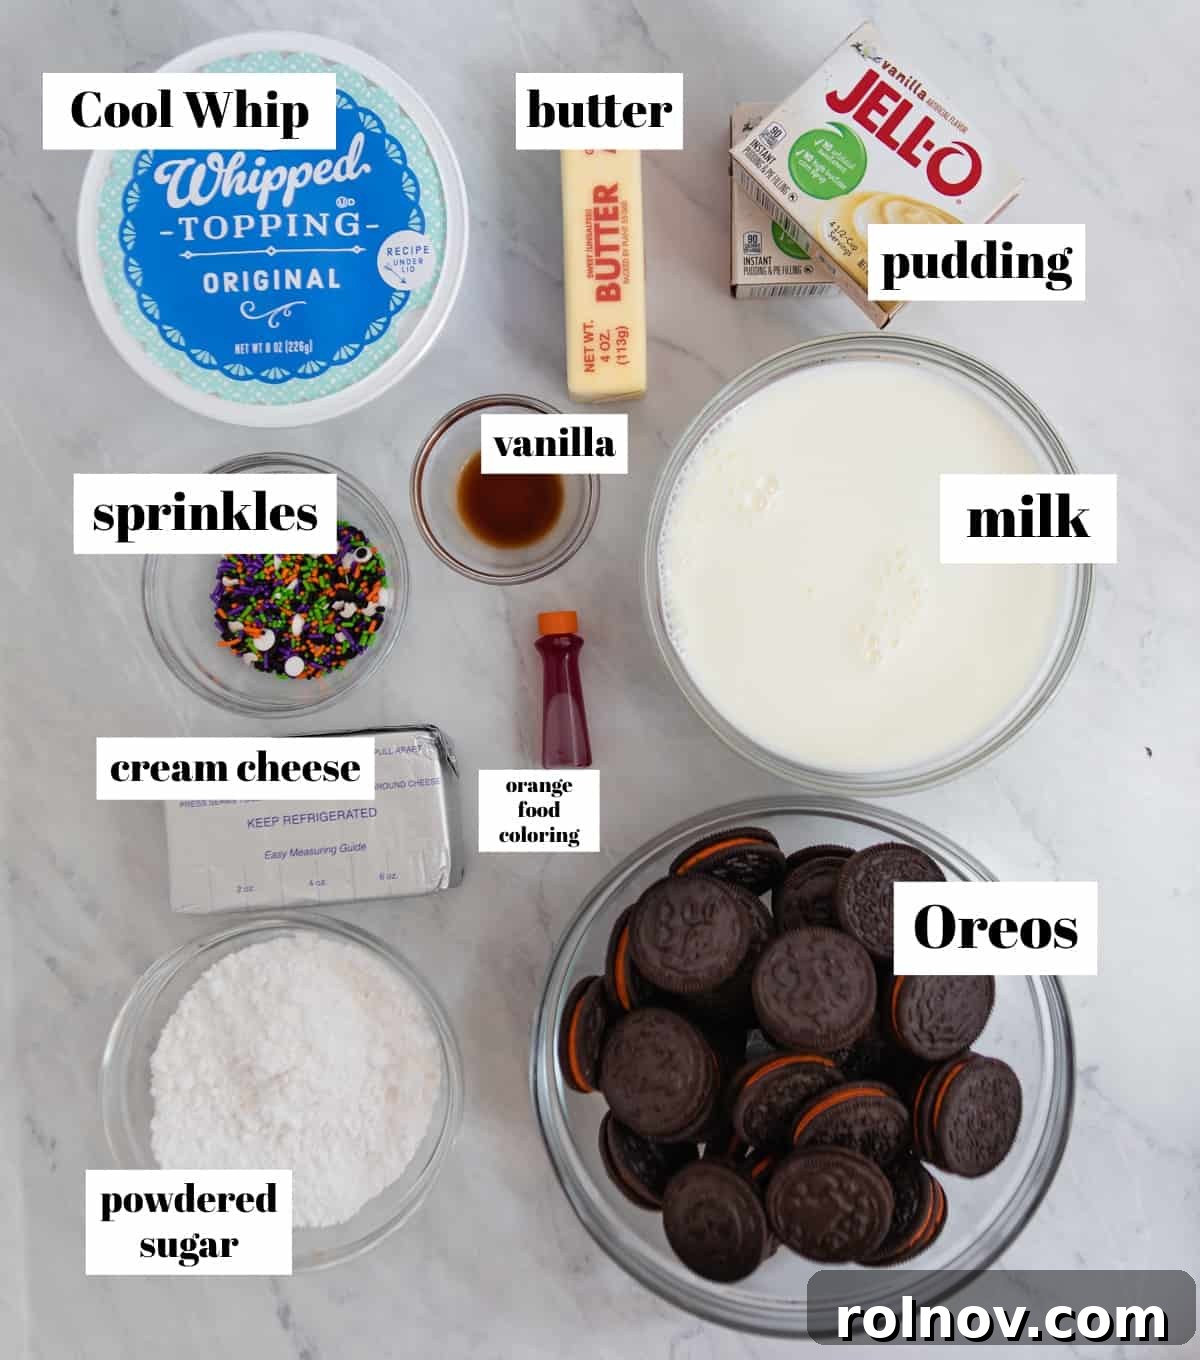
Crafting this spooky-good dirt cake requires a few simple ingredients, most of which you likely already have on hand or can easily find at your local grocery store. Each component plays a crucial role in creating the perfect balance of texture, sweetness, and festive flair.
- Oreos: The star of our “dirt”! For a true Halloween theme, the Halloween Oreos with their orange cream filling are absolutely perfect. A 20 oz. package contains about 40 cookies. While one package can suffice, I highly recommend using closer to 1 ½ packages. This allows for both a fine, dirt-like crumb and some roughly chopped pieces, creating more visible layers and a delightful textural contrast. If you can’t find Halloween-themed Oreos, classic Oreos work just as wonderfully; the black cookie crumb still provides that essential “dirt” look. Don’t be afraid to experiment with other Oreo flavors for different holiday themes!
- Milk: Essential for preparing the instant pudding. I typically use whole milk for its richness, which contributes to a creamier pudding texture. However, any type of milk (2%, skim, almond, soy) should work well, though the final texture may vary slightly.
- Instant Vanilla Pudding: Be sure to grab instant pudding mix, not the cook-and-serve variety. Instant pudding sets quickly and is crucial for the no-bake aspect of this recipe. French Vanilla instant pudding is also a fine choice if you prefer a slightly more complex vanilla flavor.
- Butter: Softened unsalted butter is key for achieving a smooth, rich, and creamy base for the pudding layer. If you only have salted butter, reduce or omit any added salt in other parts of the recipe, though none is typically called for here. Ensure it’s truly softened to room temperature for easy blending.
- Cream Cheese: Softened full-fat cream cheese is recommended for the most luxurious and decadent pudding layer. Its tanginess beautifully balances the sweetness of the other ingredients. If you prefer, a reduced-fat cream cheese can be used, and the cake should still turn out delightfully, albeit with a slightly lighter texture.
- Powdered Sugar: This fine sugar serves a dual purpose: it adds the perfect touch of sweetness to our creamy layer and, thanks to its cornstarch content, helps to thicken the pudding mixture, mimicking the consistency of a no-bake cheesecake.
- Cool Whip: Make sure your Cool Whip or other whipped topping is completely thawed before incorporating it into the mixture. This ensures a smooth, airy, and evenly blended pudding layer. For a homemade touch, you could substitute freshly whipped cream, but Cool Whip offers unmatched stability and ease of use in this no-bake recipe.
- Vanilla Extract: While vanilla pudding provides some vanilla flavor, a touch of extra vanilla extract truly elevates the overall taste profile of this dirt cake. It deepens the vanilla notes, adding a gourmet touch that many traditional dirt cake recipes often miss.
- Food Coloring: To achieve that iconic Halloween orange, you can either purchase orange food coloring or mix equal parts red and yellow food dyes. Gel food colorings tend to produce more vibrant hues with less liquid, which is ideal for maintaining the pudding’s consistency. For those who prefer natural options, natural food coloring options are readily available and work great.
- Halloween Sprinkles & Decorations: These are entirely optional but highly encouraged for adding a festive, spooky touch! I love a good mix of Halloween sprinkles that include ghosts, eyeballs, pumpkins, and bats. Other fantastic options include gummy worms (a classic dirt cake staple!), candy corn, mini candy pumpkins, chocolate tombstones, or even small plastic spiders for an extra creepy detail. These elements transform a simple dessert into a holiday spectacle.
While gummy worms are a classic addition to any dirt cake, I opted for a diverse sprinkle mix this time around to add unique color and texture. Plus, my toddler has a knack for “pre-sampling” all the gummy candy before it even makes it into the dish!
Spooktacular Step-by-Step Assembly:
Creating this Halloween Oreo Dirt Cake is a straightforward process, broken down into two main parts: preparing your Oreo “dirt” and crafting the luscious orange pudding layer. Follow these steps for a perfectly layered and delicious dessert.
Prep Your Oreo “Dirt”:
The key to authentic dirt cake layers is getting the right texture for your Oreos. We want a mix of fine crumbs and slightly chunkier pieces to mimic real soil and add visual interest.
- Begin by taking about three-quarters of your chosen Oreos (approximately 1 to 1 ¼ packages if using 1 ½ total). Place these in a food processor and pulse until they form a fine, sand-like crumb. This will be the base texture of our “dirt.” Transfer these fine crumbs into a medium-sized bowl.
- Next, add the remaining Oreos (about half a package) to the food processor. Pulse these more lightly, aiming for roughly chopped pieces. You want some discernible cookie chunks, not just fine powder. This variation in texture adds to the appeal of the “dirt” layers.
- Combine both the fine crumbs and the roughly chopped Oreos in the bowl and give them a gentle stir to mix. Set this aside; it’s ready to form your cake’s “earthy” layers.
Time to Prep the Creamy Pudding Layer!
This is where the vibrant orange hue and creamy texture truly come to life. Pay attention to the order of operations for the best results.
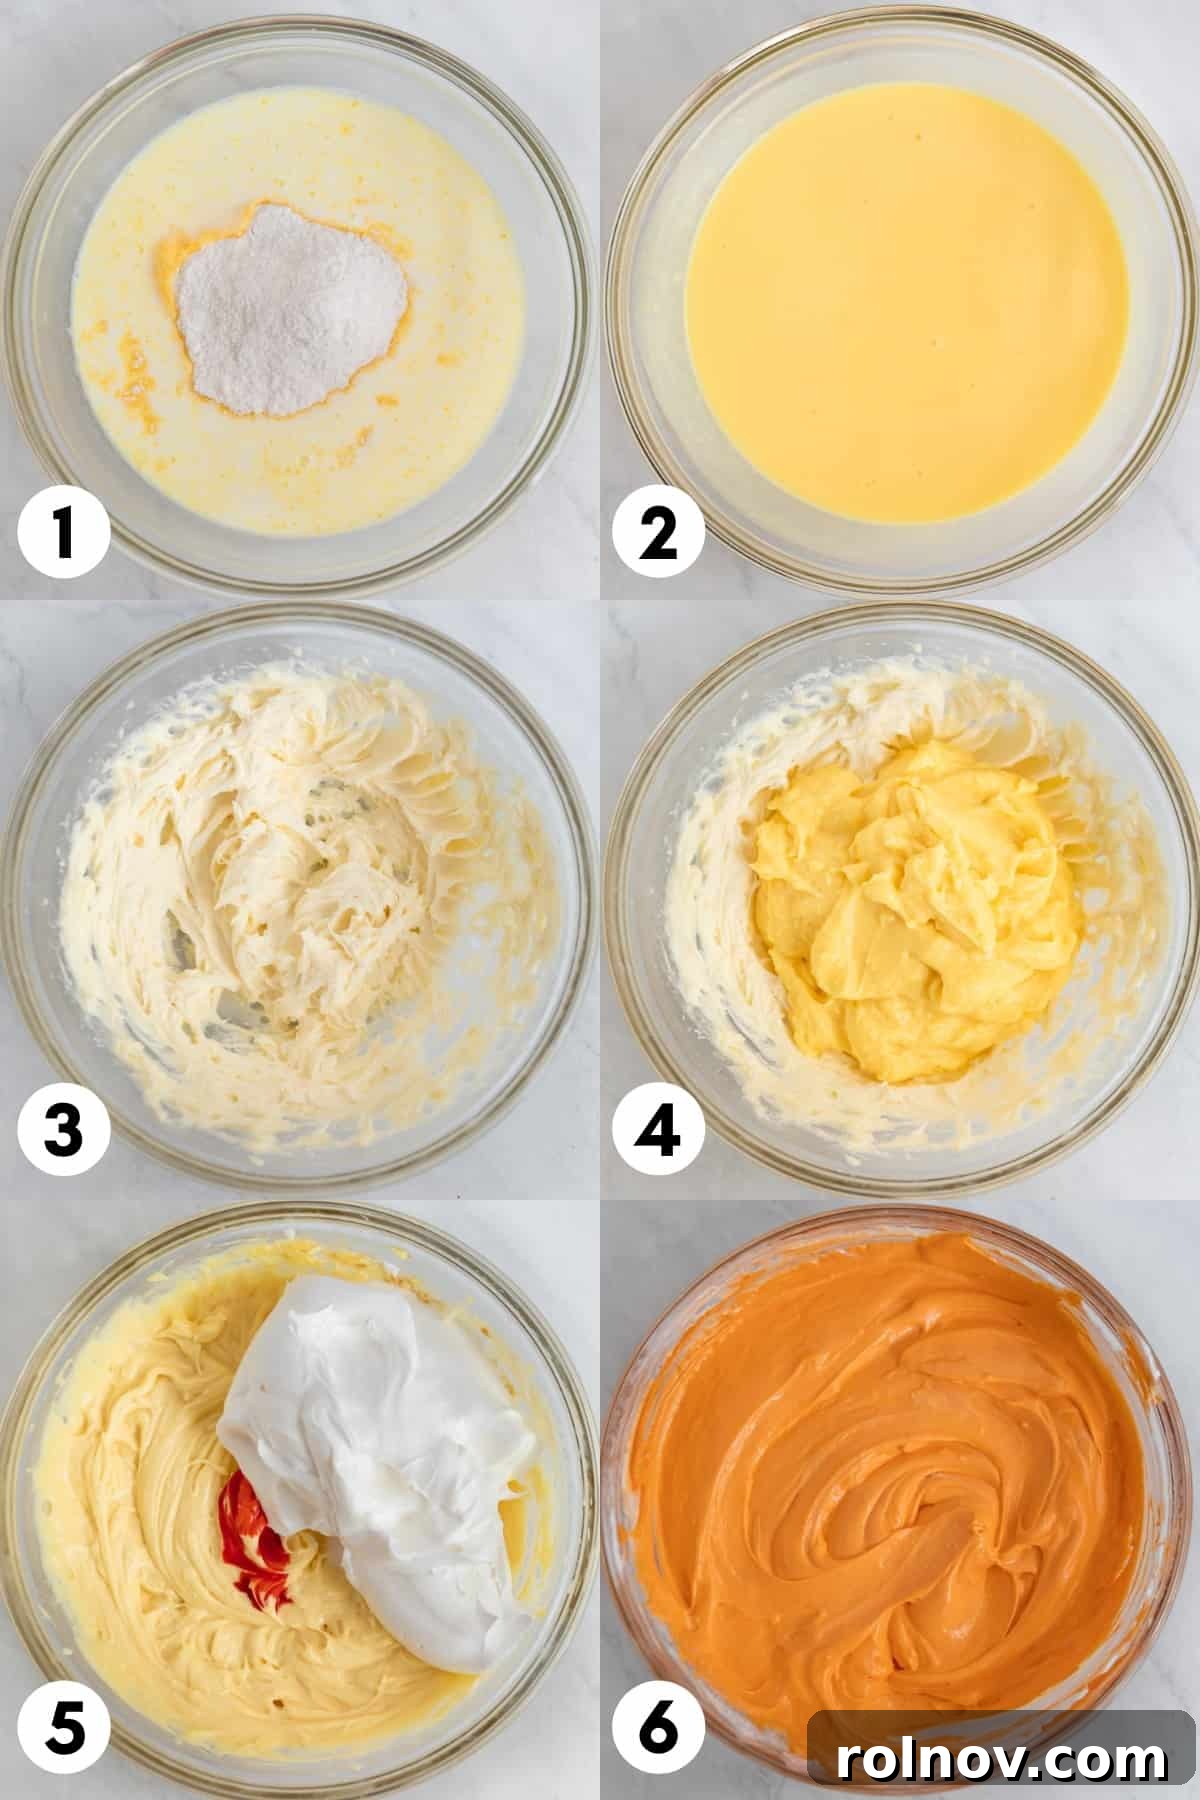
- Step 1: Prepare the Instant Pudding Base. In a large mixing bowl, vigorously whisk together the cold milk and both packages of instant vanilla pudding mix for a full 2 minutes until the mixture is smooth and begins to thicken significantly. It’s crucial that it thickens quickly because we’re using less milk than typically called for on the pudding box instructions, ensuring a denser, more stable pudding layer. Once thickened, transfer the pudding to the refrigerator to chill for about 5 minutes. This brief chill time is a secret weapon; it allows the pudding to set even further, preventing a runny layer and making it easier to work with.
- Step 2: Create the Cream Cheese Butter Base. While the pudding chills, combine your softened butter, softened cream cheese, and powdered sugar in a separate large mixing bowl. Using an electric mixer (handheld or stand mixer), beat these ingredients together on medium speed for 1-2 minutes until the mixture is completely smooth, light, and creamy, with no lumps of butter or cream cheese remaining.
- Step 3: Combine Pudding and Cream Cheese Mixture. Retrieve the chilled pudding from the refrigerator. Add the slightly set pudding to the cream cheese mixture. Beat again with the electric mixer until thoroughly combined and perfectly smooth. Any small clumps that might have formed in the pudding during chilling should now disappear, leaving you with a wonderfully uniform consistency.
- Step 4: Incorporate Cool Whip, Vanilla, and Color. Finally, gently fold in the thawed Cool Whip (or whipped topping), vanilla extract, and your orange food coloring. Start with a few drops of food coloring and gradually add more, folding until you achieve your desired shade of vibrant Halloween orange. Remember, gel food coloring provides the most intense color with minimal liquid, which is ideal here. Continue folding until the color is fully uniform throughout the mixture. This light folding motion helps maintain the airy texture of the Cool Whip.
Assemble Your Spooky Dirt Cake:
Now for the fun part – assembling your Halloween masterpiece! This is where your creativity can truly shine. You have the flexibility to create a grand, communal dessert or charming individual servings. For detailed ideas on different serving options, refer to the “Other Ways to Serve this Dessert” section below.
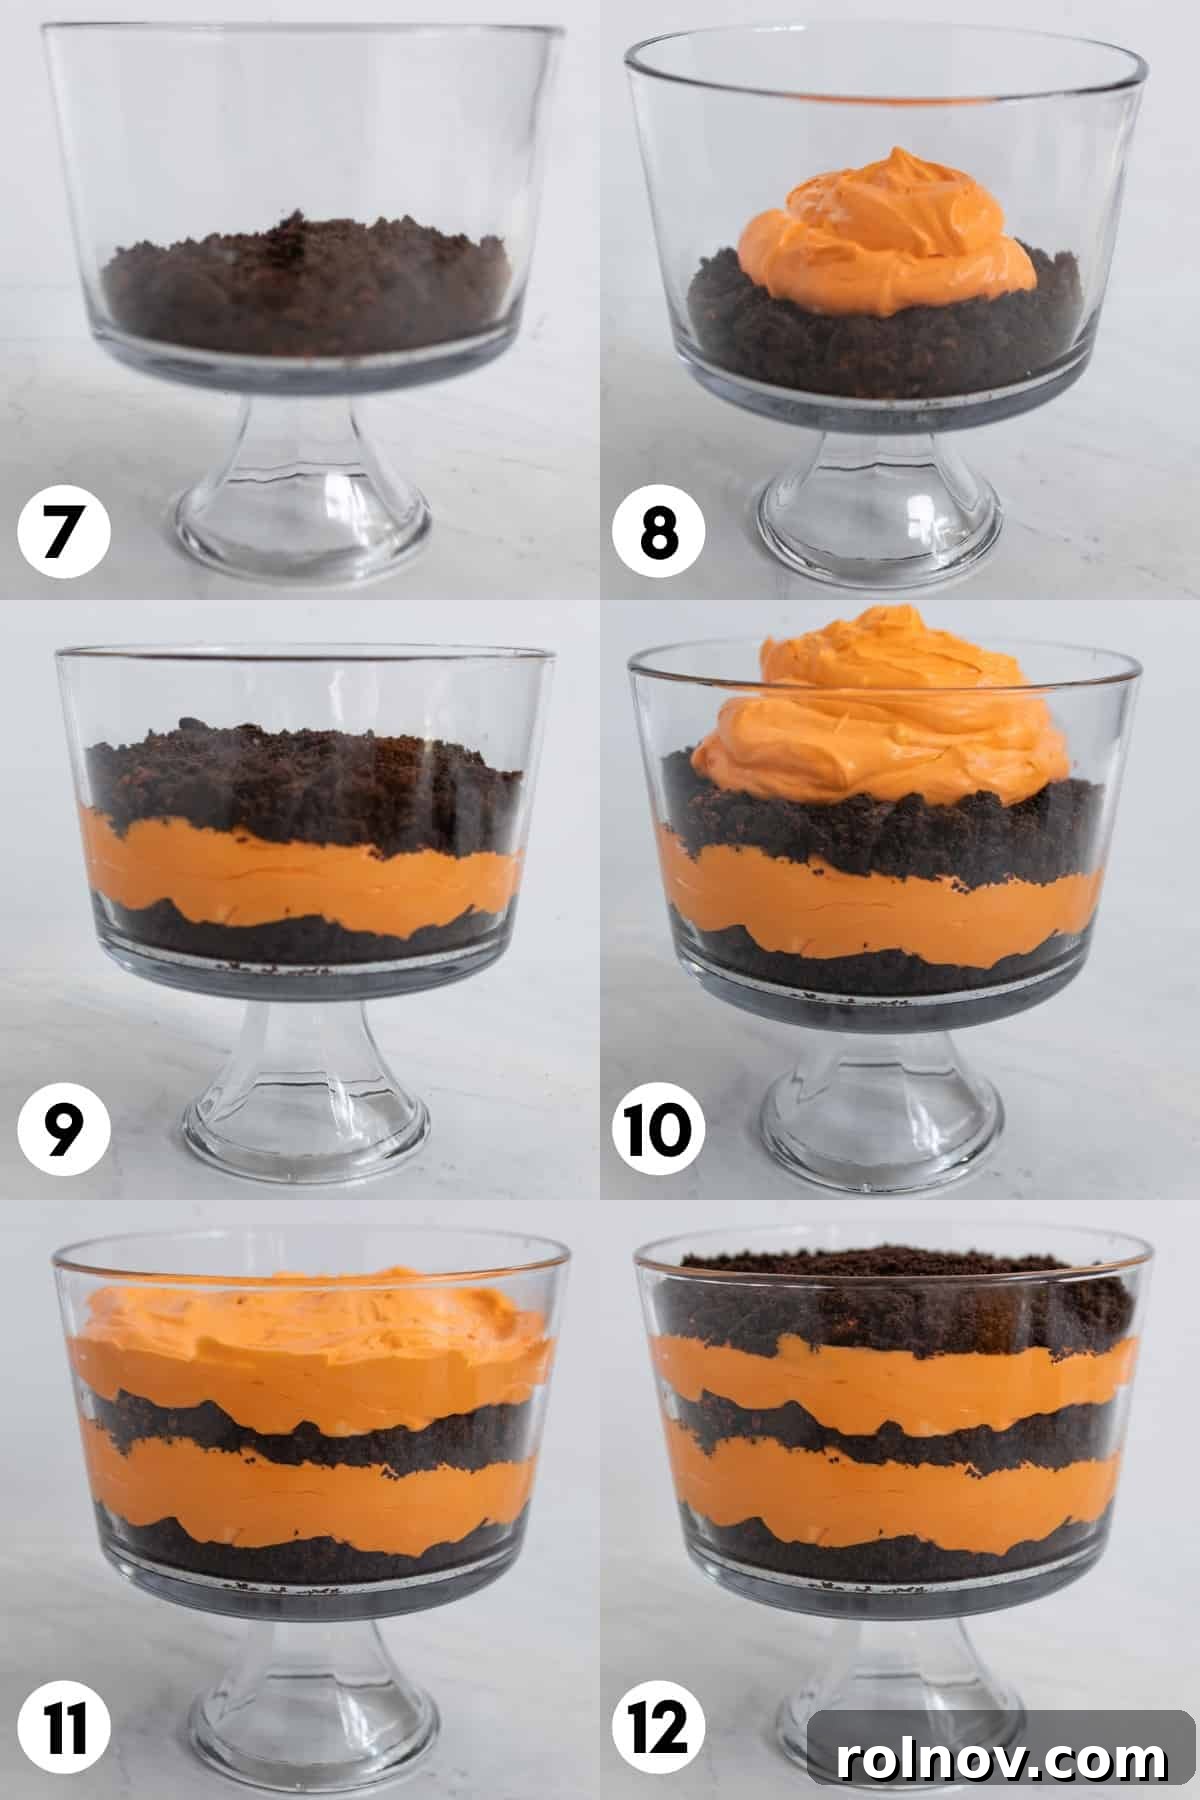
Here’s my preferred method for layering this Halloween Oreo Dirt Cake, resulting in beautiful, distinct stripes of “dirt” and creamy orange pudding:
- Layer 1: The Oreo Foundation. Begin by spreading approximately one-third of your crushed Oreo mixture onto the bottom of your chosen serving dish (a trifle bowl or a large glass bowl works perfectly). The exact amount will depend on the overall quantity of Oreos you’ve prepared and the size of your dish. Aim for about 1 ½ cups per layer for a substantial base. Gently press the Oreos down with the back of a spoon or your hand to create an even, compact layer. This helps define the layers visually.
- Layer 2: First Pudding Layer. Using a ladle or a large spoon, carefully spoon half of your vibrant orange pudding mixture over the Oreo layer. Take a small spoon or spatula and gently spread it out evenly across the entire surface. Work slowly and carefully to avoid disturbing the Oreo layer underneath.
- Layer 3: The Mid-Layer of “Dirt.” Sprinkle another third of your crushed Oreos evenly over the orange pudding layer. Again, very gently press them down just enough to create a relatively flat surface without pushing into the creamy layer too much. This creates a satisfying textural break.
- Layer 4: The Final Pudding Layer. Spoon the remaining orange pudding mixture into the center of the newly added Oreo layer. Carefully spread it out to the edges, ensuring a smooth and even top. This will be the penultimate creamy layer of your dessert.
- Layer 5: The Top “Dirt” and Decorations. Generously sprinkle the remaining crushed Oreos over the top of the final pudding layer, spreading them out evenly to cover the entire surface. This forms the signature “dirt” topping. Now, unleash your Halloween spirit! Add festive Halloween sprinkles, candy pumpkins, candy corn, gummy worms, or any other spooky decorations you desire. If using gummy candies, it’s best to add them closer to serving time to prevent them from becoming too hard or melting into the pudding.
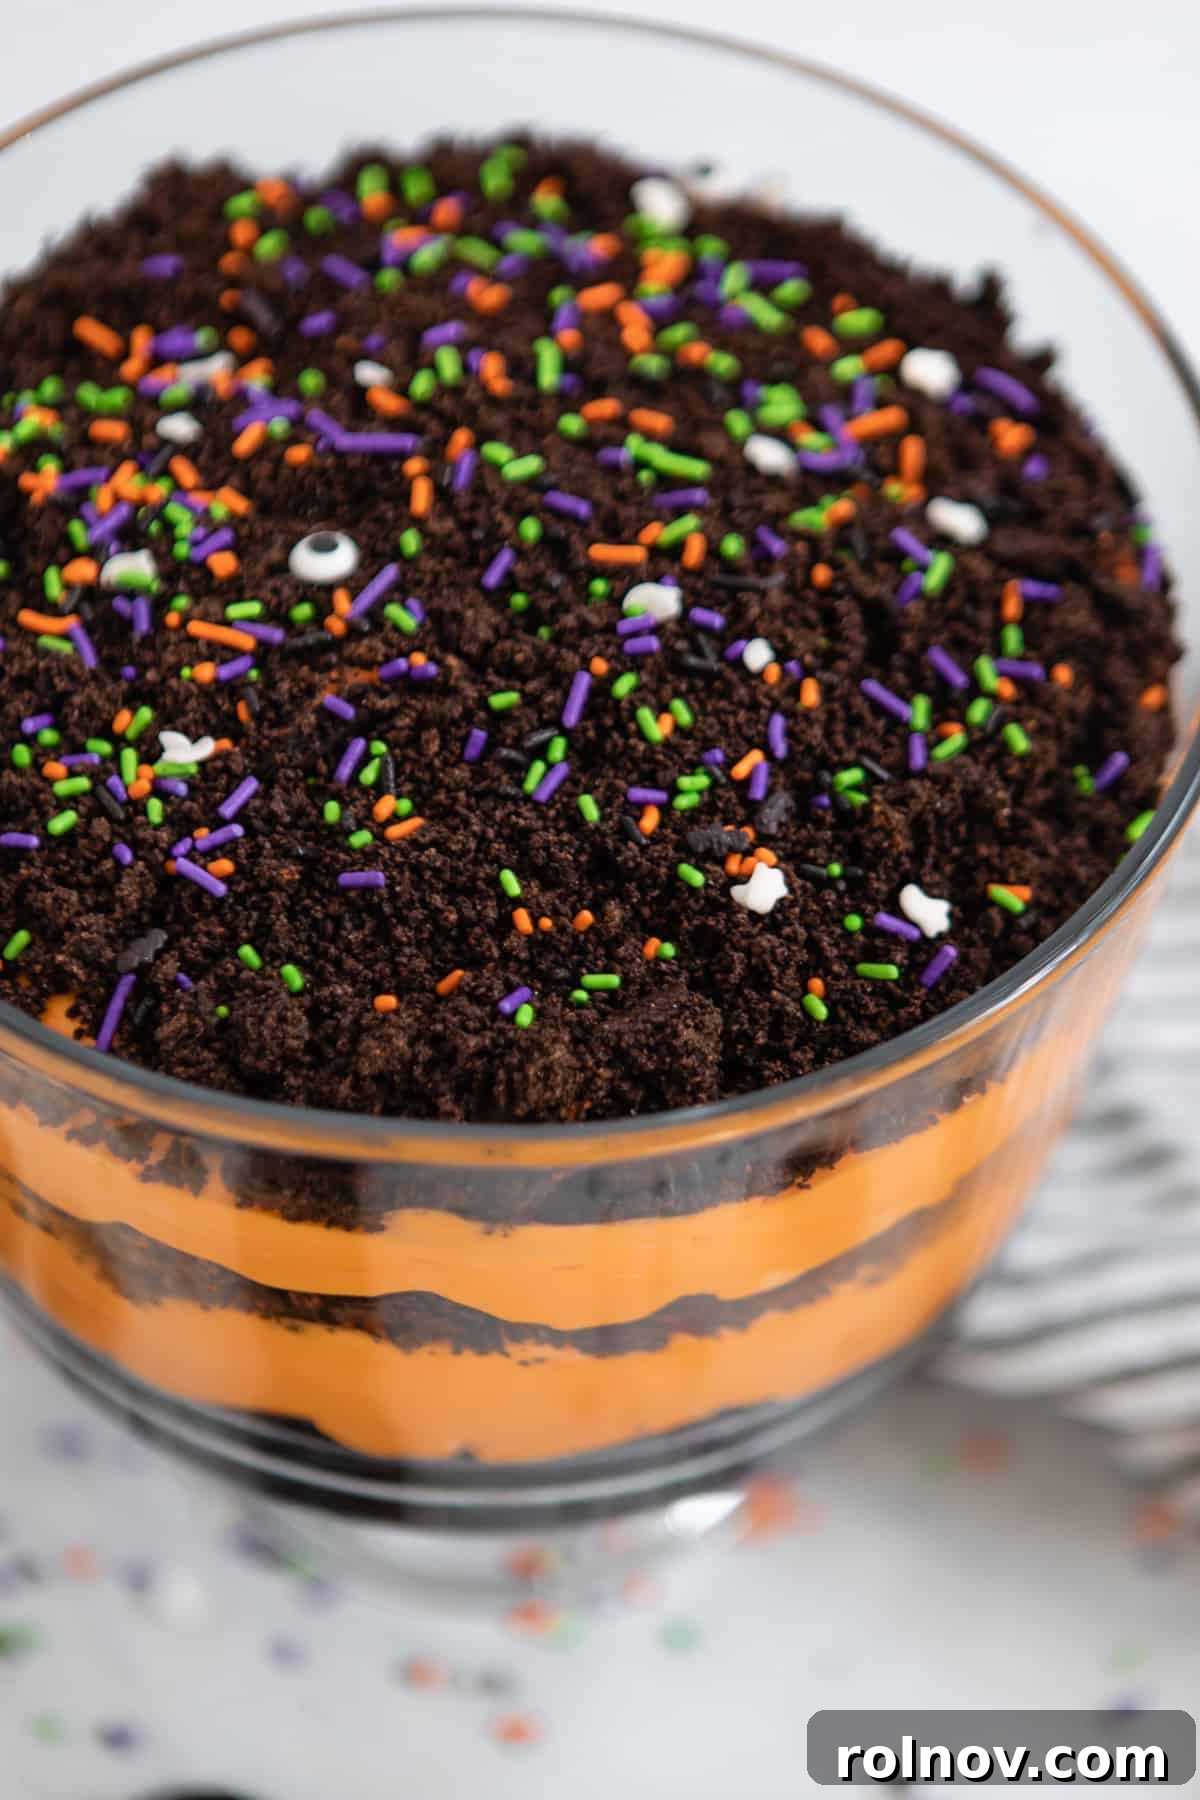
While the temptation to dig in immediately might be strong, I highly recommend chilling this dessert for at least 2-3 hours before serving. This crucial step allows the pudding layer to fully thicken and set, and also gives the flavors a chance to meld beautifully with the Oreo crumbs. For optimal deliciousness and texture, making this dessert a day in advance and letting it chill overnight is truly ideal. It ensures everything is perfectly firm and infused with flavor, ready to impress your guests!
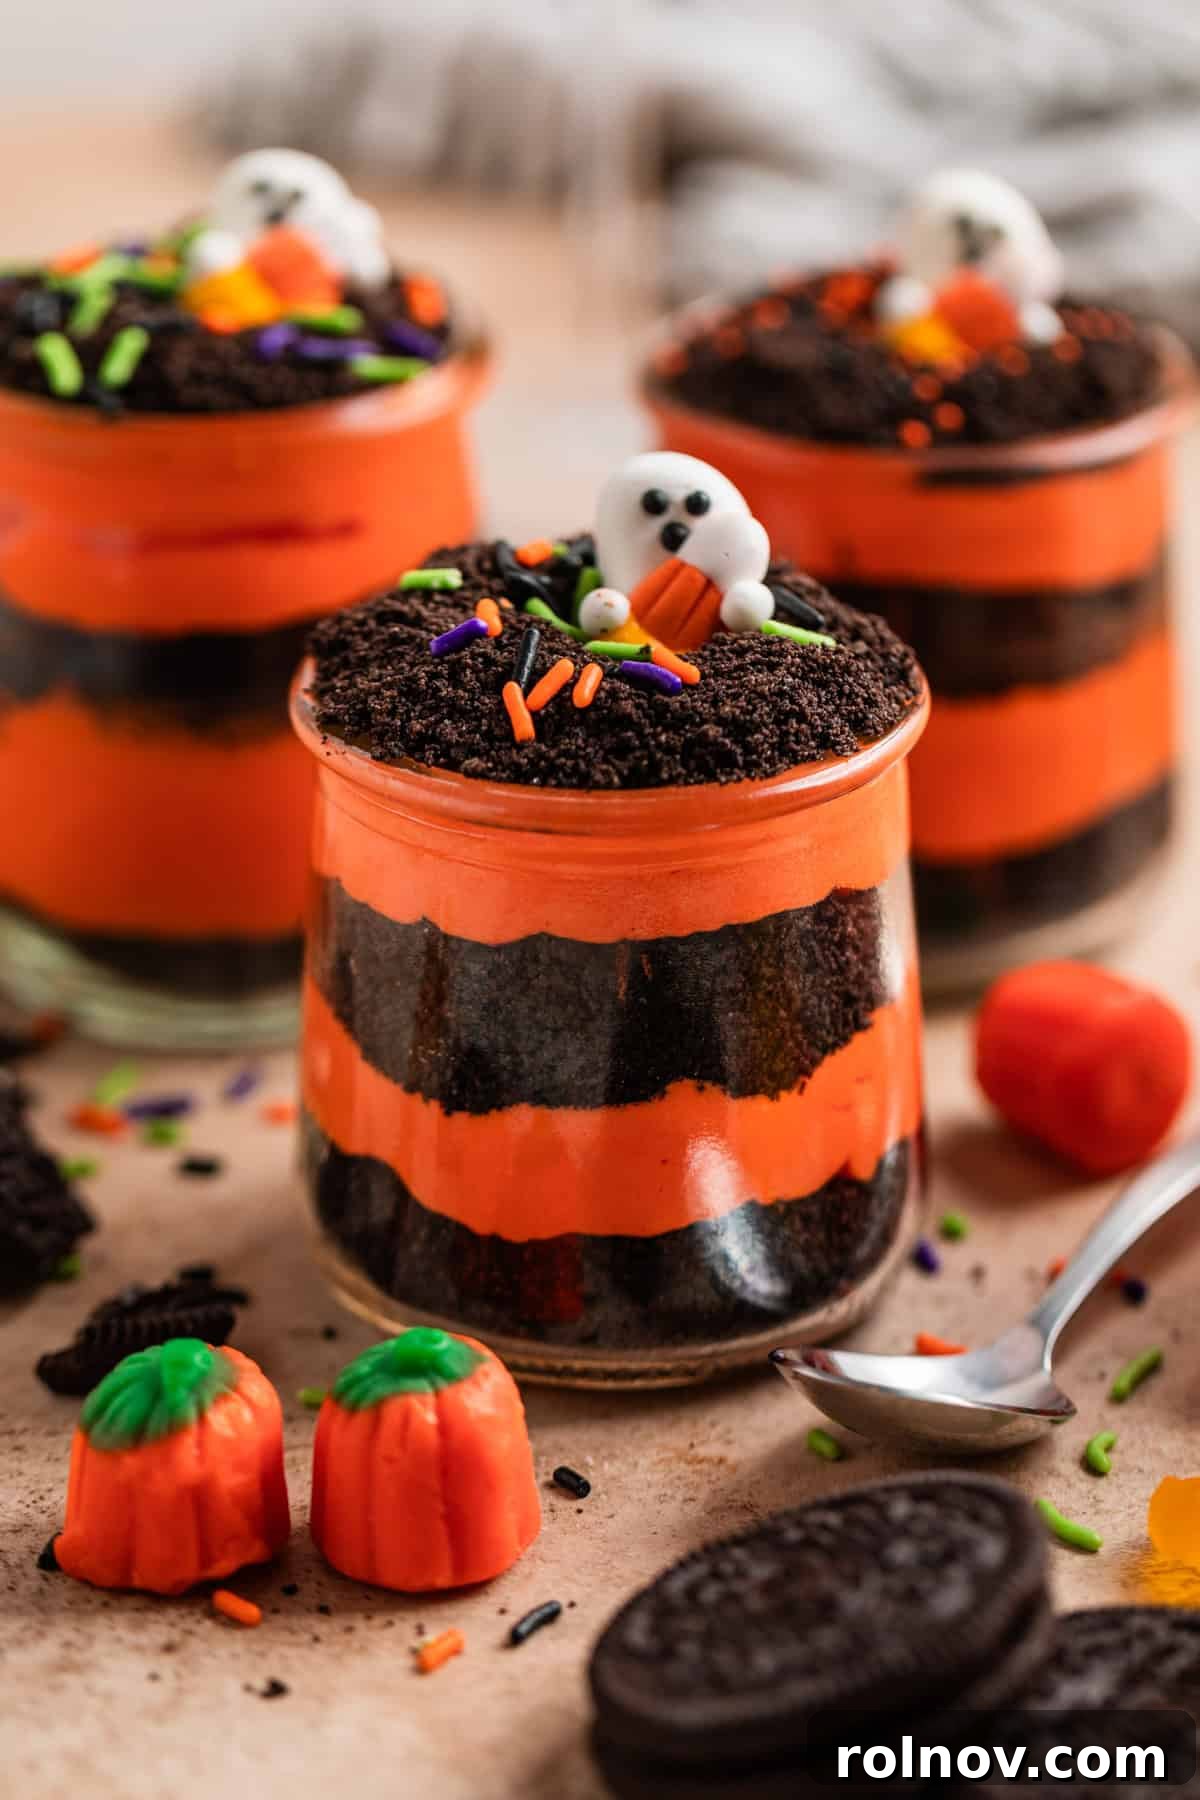
Creative Ways to Serve Your Halloween Dirt Cake:
The beauty of this Halloween Oreo Dirt Cake lies in its adaptability. While a large trifle bowl makes a stunning centerpiece, there are numerous other creative ways to present this festive dessert.
- Charming Single Serving Dishes: For individual portions that are easy to distribute and perfect for party guests, consider serving this Halloween Oreo Dirt Cake in individual glasses, small mason jars, clear plastic cups, or even mini pumpkin-shaped dishes. The visual appeal of the orange and black layers is especially striking in transparent containers. Depending on the size of your chosen containers, you can expect to get anywhere from 12 to 20 servings from this recipe. I particularly love using Oui yogurt glasses, as seen in some of the photos – they’re perfectly sized and make for an elegant presentation, plus you get to enjoy a yogurt first!
- Classic 9×13 Inch Pan: This is how the original dirt cake was often served. If opting for a large cake pan or a rectangular baking dish, you can still achieve delightful layers. You might find it easier to create two distinct orange pudding layers between three Oreo layers, or for a simpler approach, use half the Oreos for the bottom, all of the orange pudding mixture in the middle, and the remaining Oreos for the top. If you aim for multiple layers in this pan size, they will naturally be a bit thinner, but still equally delicious and visually appealing.
- Mini Flower Pots: For an ultra-authentic “dirt” look, consider serving individual portions in small, clean, food-safe mini flower pots (new ones, of course!). Place a small cupcake liner in the bottom before layering, and add a few gummy worms peeking out for a realistic garden effect.
- Layered in a Punch Bowl: For a very large gathering, a clear glass punch bowl can make an impressive and dramatic statement piece, showcasing all those vibrant layers beautifully.
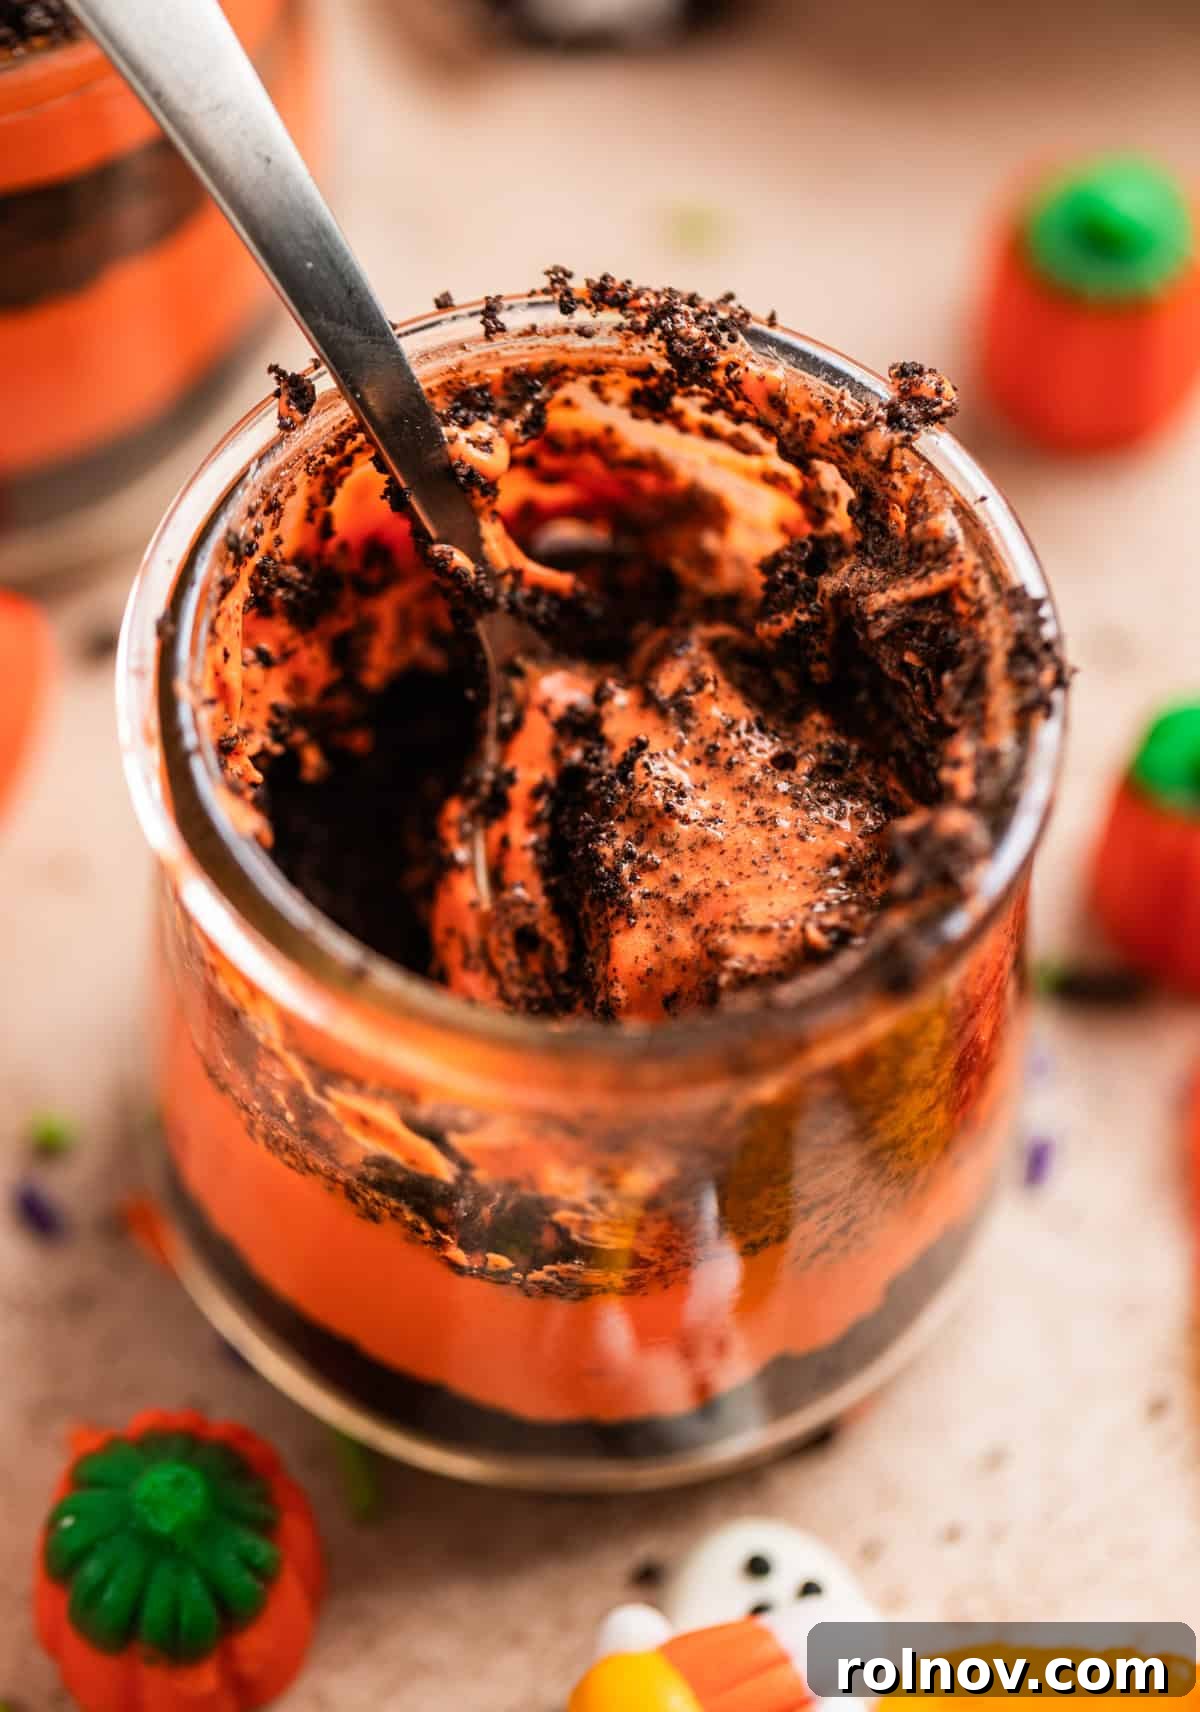
Essential Recipe Notes and Expert Tips:
To ensure your Halloween Oreo Dirt Cake turns out perfectly every time, keep these valuable tips and notes in mind:
- Optimal Chilling Time is Key: While you can serve this dessert immediately if you’re in a pinch, it truly shines after chilling. I highly recommend preparing this Halloween Oreo dessert 24 hours before serving. Chilling overnight allows the pudding layers to fully set, firm up, and beautifully meld with the Oreo crumbs, resulting in a more cohesive texture and intensified flavor. The extra time in the refrigerator makes a significant difference.
- Customize Your Colors for Any Occasion: The beauty of this recipe is its incredible adaptability. While we’re going for a vibrant orange for Halloween, feel free to adjust the food coloring to match any favorite team, holiday, or party theme! For Christmas, go with festive red and green layers. For a birthday party, incorporate the guest of honor’s favorite color. The possibilities are endless, making this a truly versatile no-bake dessert.
- Regular Oreos Work Wonders Too: Don’t fret if you can’t get your hands on the seasonal Halloween Oreos. Classic, regular Oreos will work just fine and deliver the same beloved chocolatey “dirt” flavor. The orange cream filling in the Halloween variety adds a nice pop of color and subtle flavor, but it’s not strictly necessary for a delicious result. You could even explore other Oreo flavors like Golden Oreos for a different base color or Mint Oreos for a festive twist (though perhaps less “dirt-like”!).
- Ensure Softened Ingredients: For the creamiest pudding layer, it’s crucial that both your butter and cream cheese are at room temperature and properly softened. Cold ingredients will result in a lumpy mixture that’s difficult to beat smooth. Take them out of the refrigerator at least 30-60 minutes before you start mixing.
- The Power of the Food Processor: While you can crush Oreos by placing them in a Ziploc bag and crushing them with a rolling pin, a food processor is highly recommended for achieving both the fine crumb and the roughly chopped textures efficiently. It ensures a consistent result with minimal effort.
- Decorate Just Before Serving (for some items): If you plan to use gummy worms, candy corn, or other soft candies as decoration, it’s best to add them shortly before serving. This prevents them from becoming too hard in the refrigerator or bleeding their colors into the pudding layers. Sprinkles, however, can be added when you finish assembling.
- Storage: Leftover Halloween Oreo Dirt Cake should be stored covered tightly in the refrigerator. It will stay fresh and delicious for about 4-5 days. While it can be frozen for longer storage (up to a month), the texture of the pudding and whipped topping may change slightly upon thawing, becoming a bit softer.
More Irresistible Oreo Creations:
If you’re an Oreo enthusiast like me, you’ll be thrilled to discover more delightful recipes that feature this iconic cookie. Here are a few to satisfy your cravings:
- Golden Oreo Truffles: A decadent, no-bake treat featuring the sweet, vanilla goodness of Golden Oreos, perfect for any celebration.
- Oreo Chocolate Chip Cookies: A classic chocolate chip cookie elevated with chunks of everyone’s favorite cream-filled cookie for an extra dose of deliciousness.
- Peanut Butter Cookies and Cream Ice Cream: Indulge in creamy, homemade no-churn ice cream swirled with rich peanut butter and generous pieces of Oreo cookies.
HUNGRY FOR MORE? Subscribe to my newsletter and follow me on Facebook, Instagram and Pinterest for all the latest!
★
★
★
★
Halloween Oreo Dirt Cake

Ingredients
- 1 – 1 ½ package Halloween Oreos, 20 oz., this can vary, see notes*
- 2 packages instant vanilla pudding, 3.4 oz.
- 3 1/4 c milk
- 1/2 c butter, softened
- 8 oz cream cheese, softened
- 1 c powdered sugar
- 1 tsp vanilla extract
- 8 oz cool whip, thawed
- Orange food coloring
- Halloween sprinkles
Instructions
Prep the Oreos:
-
Add 3/4 of the Oreos to a food processor. Process until fine and grain like. Transfer to a medium bowl. Add the remaining Oreos to the food processor and pulse until crushed into smaller chunks, but not as fine as the other Oreos. Add to the bowl with other Oreos and stir to combine. Set aside.
Make the Pudding Layer:
-
Whisk together the milk and pudding mixes well for about 2 minutes until smooth. Set in the refrigerator for about 5 minutes to chill.
-
While the pudding chills, use an electric mixer to beat the softened cream cheese, butter and powdered sugar until smooth and creamy. Add the chilled pudding into the bowl and beat to combine.
-
Fold in the thawed cool whip/whipped topping, food coloring and vanilla extract and stir until color is fully incorporated. Add more food coloring as desired. It took me almost 2/3 of a small bottle of orange dye to get the strong orange color.
Assemble the Dirt Cake:
-
Add 1/3 of the crushed Oreos to the bottom of a trifle bowl or large glass bow or dish. Gently spread them out to make an even layer. Using a ladle, spoon 1/2 of the orange pudding mixture over top and spread gently using a small spoon or spatula to make the layer even.
-
Repeat and add another third of the Oreo mixture followed by the other half of the orange mixture. Add the remaining crushed Oreos over top and spread. Decorate with Halloween sprinkles, candies, or an other desired additions. If adding gummy candy, wait until serving to add on top.
-
For best results chill for at least 2 hours before serving and up to 24 hours if desired. Serve and enjoy!
-
Store leftovers covered in the refrigerator for about 5 days.
Notes
- You can prep this Halloween Oreo dessert 24 hours before serving. I think it is much better after at least chilling overnight. Since the pudding thickens before you add it to the recipe, you can even serve it right when it is made. Up to you!
- Adjust the colors to your favorite team, holiday, and more! The colors can change according to what you like. If it’s Christmas, go for red and green. Maybe a birthday party? Use the guest of honor’s favorite color!
- Regular Oreos will also work just fine. If you can’t get a hold of the holiday Oreos, the classics are fine. I like adding the orange, but not necessary!
Inspired by the classic dirt cake recipe from All Recipes.
Nutritional information is provided as a courtesy only and should be construed as an estimate rather than a guarantee. Ingredients can vary and Lemons + Zest makes no guarantees to the accuracy of this information.
Nutrition
Carbohydrates: 49g,
Protein: 6g,
Fat: 26g,
Saturated Fat: 13g,
Polyunsaturated Fat: 2g,
Monounsaturated Fat: 8g,
Trans Fat: 1g,
Cholesterol: 51mg,
Sodium: 367mg,
Potassium: 228mg,
Fiber: 1g,
Sugar: 34g,
Vitamin A: 631IU,
Calcium: 125mg,
Iron: 4mg
Nutrition information is automatically calculated, so should only be used as an approximation.
Frequently Asked Questions (FAQs):
Here are some common questions about making and serving Halloween Oreo Dirt Cake:
- Can I use homemade whipped cream instead of Cool Whip? Absolutely! Homemade whipped cream will provide a richer, fresher flavor. Just be aware that it might not be as stable as Cool Whip, so for best results, serve the cake sooner after assembly if using homemade whipped cream.
- Can I use regular pudding mix that requires cooking? No, it’s crucial to use instant pudding mix for this recipe. Cook-and-serve pudding will not set properly when combined with the other ingredients in this no-bake method.
- How long does Halloween Oreo Dirt Cake last? When stored properly in an airtight container in the refrigerator, this dirt cake will remain delicious for about 4-5 days.
- Can I freeze this dirt cake? Yes, you can freeze it! Wrap it tightly in plastic wrap and then in aluminum foil. It can be frozen for up to one month. Thaw in the refrigerator overnight before serving. Note that the texture of the whipped topping and pudding might become slightly softer after freezing and thawing.
- What other decorations can I add? Get creative! Mini chocolate chips, green gummy worms, candy corn, mini Reese’s Pieces (orange and yellow), chocolate ghosts or skeletons, edible googly eyes, or even a few toy plastic spiders (removed before eating, of course!) can enhance the Halloween theme.
- Is this recipe gluten-free or vegan? As written, no. However, you can make substitutions. Look for gluten-free Oreo-style cookies and gluten-free instant pudding mix. For a vegan version, use plant-based Oreo-style cookies, dairy-free milk, vegan cream cheese, vegan butter, and a plant-based whipped topping (like coconut whip).
Why This Halloween Oreo Dirt Cake is a Spooky Season Must-Have:
In conclusion, this Halloween Oreo Dirt Cake is more than just a dessert; it’s a delightful experience that brings joy and a touch of seasonal whimsy to any gathering. Its no-bake convenience, versatile presentation, and crowd-pleasing flavors make it an undeniable winner for Halloween and beyond. The striking orange and black layers, combined with the playful “dirt” texture, create a visual and culinary treat that’s as fun to make as it is to eat. Whether you’re a seasoned baker or new to the kitchen, this recipe is designed for success, offering a simple yet spectacular way to celebrate the holiday.
So, gather your ingredients, unleash your inner ghoul, and get ready to create a dessert that will have everyone reaching for another spoonful. It’s the perfect treat to cap off a night of trick-or-treating or to add a festive touch to your Halloween table. We encourage you to try this recipe, experiment with your own spooky decorations, and share your fantastic creations!
Shop Essential Tools for Your Spooky Creation:
To help you create the perfect Halloween Oreo Dirt Cake, here are some recommended kitchen tools and ingredients that will make the process even smoother:
Trifle Bowl
Buy Now →
Halloween Sprinkles
Buy Now →
Ladle
Buy Now →
Hand Mixer
Buy Now →
Mixing Bowls
Buy Now →